Create Space for Making — Without Spending a Fortune
There’s something deeply grounding about carving out a small corner of the world just for making. Whether it’s a sunny windowsill, a spare table, or a nook in the shed, your creative space doesn’t have to be large or expensive – it just needs to hold space for you.
When I began setting up my own space, I had little money but plenty of imagination. I quickly learned that creativity loves resourcefulness: a reused jar, a rescued chair, a shaft of morning light.
This guide will help you design a budget-friendly creative studio that feels welcoming, functional, and uniquely yours.
1. Start with What You Already Have
Before buying new, look around your home with fresh eyes. That old table gathering dust in the garage could become your new workspace. Glass jars can store brushes, buttons, or thread. Shoe boxes can be covered in paper or fabric and turned into pretty organisers.
“Creativity often thrives on limitation – it asks us to imagine what something could be, not just what it is.”
2. Let the Light In
Light is one of the most powerful (and free) design elements you have.
Set up near a window if possible – natural light boosts mood and helps you see colours clearly. For evening creating, hunt down second-hand lamps at op shops. Choose warm LED bulbs to make the space cozy and inviting.
Pro tip: A mirror or light-coloured wall opposite your window will bounce light beautifully across your workspace.
3. Keep Organisation Simple
Forget expensive storage systems. Use what you already own or can find second-hand: woven baskets, timber crates, or old tins.
Arrange supplies by category, colour, or texture. A well-organised space helps calm the mind and keeps creativity flowing.
Budget tip: Pegboards or coat racks make brilliant vertical storage for tools and materials – and they’re often available cheaply at local markets or online.
4. Add Personal Touches
Your creative space should tell your story.
Hang a few of your favourite photographs, display a sprig of native foliage, or pin up quotes that spark joy. These small, meaningful details connect your space to your sense of place – especially here in Tasmania, where nature and creativity often intertwine.
5. Stay Flexible and Let It Evolve
Your space will change as your art practice does. Keep things light and movable so you can rearrange easily. Maybe your photography table becomes a sewing station, or your craft shelf evolves into a home for sketchbooks.
Remember: A creative space is never finished – it grows as you do.
6. Build Slowly and Intentionally
Creating your dream studio doesn’t have to happen overnight. Collect pieces gradually – a reclaimed stool, a handmade shelf, a thrifted rug, a lucky find at an auction. Building your space slowly allows it to become an honest reflection of your creative journey.
7. Honour the Process
Even if your “studio” is a tray that gets packed away each evening, it still counts.
Creativity isn’t about square footage – it’s about showing up. Brew a cup of tea, light a candle, and begin where you are.
“Your creative journey starts with a single corner – and a little imagination.”
Share Your Creative Corner
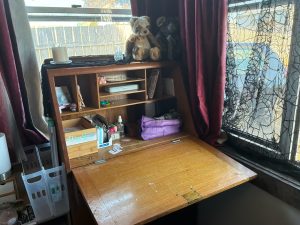
I was lucky enough to find a drop top desk at a local auction and scored it for extremely cheap. It’s been the perfect set up in the corner of my bedroom, along with 2 Raskog-style carts (not shown). I also love having a window beside & behind my desk letting in plenty of natural light during the day.
We’d love to see how you’ve set up your own budget-friendly creative space!
Tag @TasmanianMakersJournal on Instagram and use #CreativeCornerTasmania to join our growing community of makers, artists, and dreamers.
Caroline
Editor & Maker, Tasmanian Maker’s Journal